Ajay Kumar
Quick answer: how do you run Facebook ads?
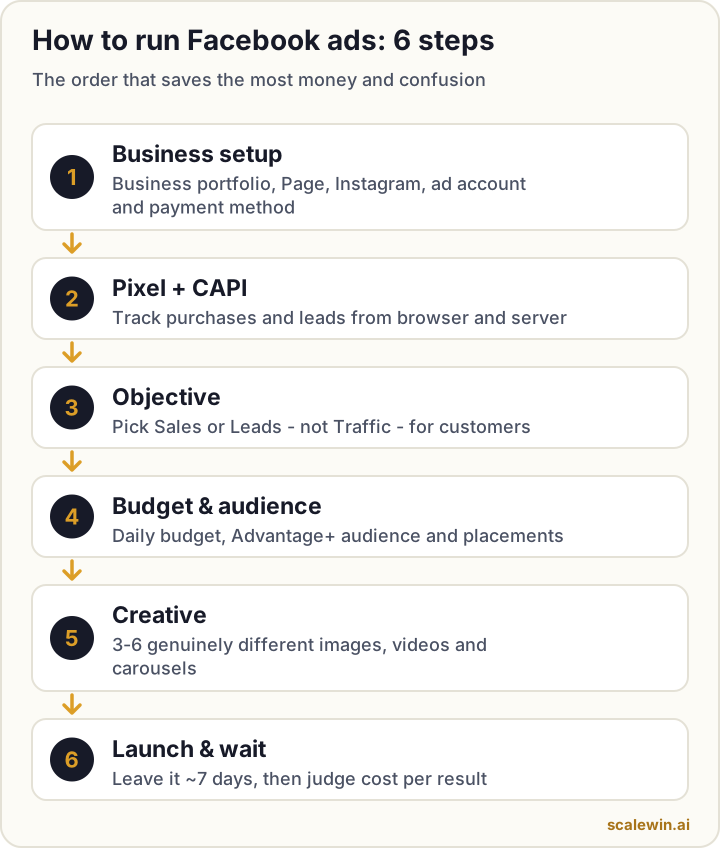
To run Facebook ads in 2026: (1) set up a business portfolio, Facebook Page and Instagram account, (2) create an ad account and add a payment method, (3) install the Meta Pixel and Conversions API, (4) in Ads Manager choose an objective such as Sales or Leads, (5) set a daily budget and let Advantage+ audience and placements find buyers, (6) upload 3-6 different creatives, then publish and leave it alone for about 7 days before judging results.
Facebook and Instagram ads are still one of the fastest ways for a growing brand to reach new customers, whether you sell in India, the Gulf, the UK, the US, Australia or South-East Asia. But when ₹10 lakh or more a month runs through Ads Manager, it can feel like the cockpit of a plane - dozens of settings, unfamiliar words and a real risk that one wrong setting wastes lakhs.
The good news: in 2026 Meta automates most of the fiddly parts. Your job is to get a handful of decisions right. This guide walks you through every step in order, and tells you which settings matter and which you can leave alone.
Before you start: what you need
Spend 30 minutes on these first. They save days of confusion later.
- A Facebook Page and an Instagram professional account for your business. Your ads run from these.
- A business portfolio (what used to be called Business Manager) in Meta Business Suite. It keeps your Page, ad account, Pixel and team access in one place.
- A place to send people - a product page, WhatsApp, a lead form or your phone number.
- Your break-even number - the most you can pay for one sale or lead. Our break-even ROAS calculator works it out in a minute.
Step 1: Set up your business portfolio and ad account
Go to Meta Business Suite and create a business portfolio if you don't have one. Add your Facebook Page and connect your Instagram account. Then create an ad account inside the portfolio.
Add a payment method
In Billing & payments, add a payment method. The options shown depend on your account and country - in India, for example, these usually include cards and prepaid funds. Set your account currency and time zone carefully: they cannot be changed later without creating a new ad account.
Step 2: Install the Meta Pixel and Conversions API
The Meta Pixel (in the browser) and the Conversions API (from your server) tell Meta when someone buys or becomes a lead after seeing your ad. Without them, Meta optimises in the dark.
On Shopify or WooCommerce, the official Meta integration sets up both in a few clicks. Read our full Meta Pixel and Conversions API setup guide for the exact steps and how to test it.
Step 3: Choose the right campaign objective
In Ads Manager, click Create. Meta offers six objectives. Pick the one that matches what you actually want to happen:
| Objective | Choose it when you want... |
|---|---|
| Sales | Online purchases, or conversations that lead to sales (e.g. on WhatsApp) |
| Leads | Enquiries through instant forms, calls or messages |
| Engagement | Messages, video views or post engagement |
| Traffic | Visits to a website or app (not purchases) |
| Awareness | Maximum reach and ad recall |
| App promotion | App installs and in-app actions |
Most businesses that want customers should start with Sales or Leads. Choosing Traffic because clicks look cheaper is one of the most expensive mistakes at this spend level - Meta will find people who click, not people who buy.
Step 4: Set your budget, audience and placements
Budget
Use a daily budget at campaign level (Advantage+ campaign budget). At ₹10 lakh to ₹1 crore a month, your account spends roughly ₹33,000 to ₹3.3 lakh a day, split across campaigns. The more expensive your product, the more budget each ad set needs to get enough results for Meta to learn. Rule of thumb: at a ₹1,000 cost per purchase, 50 purchases a week needs about ₹50,000 a week, or roughly ₹7,000 a day per ad set.
Audience
Set your location, minimum age and language if needed, then let Advantage+ audience find buyers. You can add audience suggestions (interests or past customers) as hints. Narrow interest stacking usually performs worse today than broad targeting with good creative.
Placements
Keep Advantage+ placements on. Meta will show your ad across Facebook, Instagram, Reels, Stories and more, and shift budget to where it works best.
Conversion location and goal
Choose where the conversion happens - website, WhatsApp, calls, Instagram or Messenger - and the performance goal, such as maximising the number of conversions. For website sales, pick the Purchase event from your Pixel.
Step 5: Create ads people stop scrolling for
Creative is now the biggest lever you control. Meta's targeting works best when it has several genuinely different ads to test.
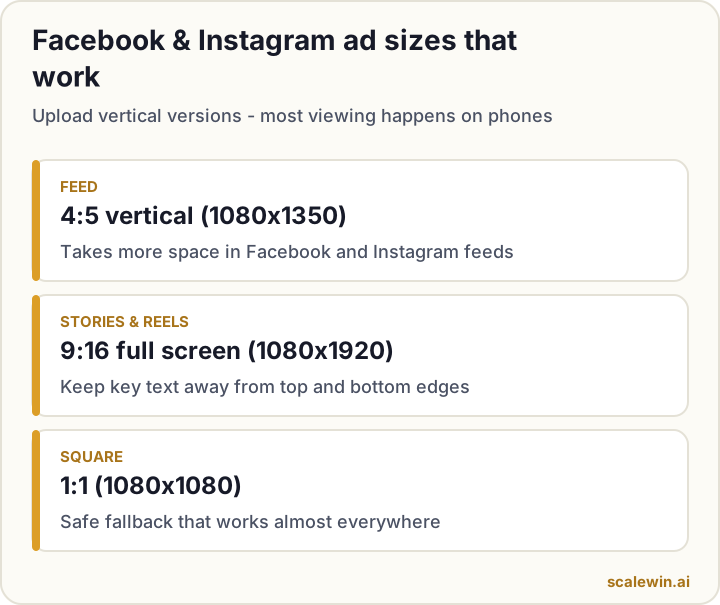
What to upload
- 3-6 different creatives - mix static images, short videos and a carousel.
- Different angles - a problem/solution ad, a customer review, an offer, a product demo.
- A strong first line in the primary text, a clear headline and the right call-to-action button (Shop now, Send WhatsApp message, Sign up).
Facebook ad creative rules of thumb
Facebook video ad tips
Show the product or the result in the first 1-3 seconds, add captions (most people watch on mute) and keep most videos under 30 seconds.
Facebook image ad tips
Use one clear message, minimal text on the image, real product photos and faces where possible.
Step 6: Publish - and leave it alone for a week
Click Publish. Meta reviews most ads within 24 hours. Once they go live, your ad set enters the learning phase: Meta needs roughly 50 optimisation events in a week to stabilise. Big edits - budget jumps, new audiences, new ads - restart learning.
How to read your results and scale
After a week, look at cost per result (cost per purchase or lead) and compare it with your break-even. Then:
- Below break-even and stable? Increase the budget by around 20% every few days.
- Above break-even? Check the creative first (low CTR), then the landing page (clicks but no sales), then the offer.
- Results dropping after a few weeks? It is often creative fatigue - see our guide on spotting and fixing creative fatigue.
Boost post vs Ads Manager: which should you use?
| Boost post | Ads Manager | |
|---|---|---|
| Setup time | 2 minutes | 15-30 minutes |
| Objectives | Limited | All six, incl. Sales and Leads |
| Conversion tracking | Basic | Full Pixel + Conversions API |
| Creative testing | One post | Multiple ads and formats |
| Best for | Extra reach on a good post | Sales, leads and growth |
Key takeaways
- Set up the business portfolio, Page, Instagram account, ad account and payment method before anything else.
- Install the Meta Pixel and Conversions API so Meta can learn who buys.
- Pick the objective that matches your real goal - usually Sales or Leads.
- Use broad / Advantage+ audience and placements, and spend your energy on 3-6 genuinely different creatives.
- Give a new campaign about 7 days before making big changes, and judge it against your break-even cost per result.
Running Facebook ads: frequently asked questions
How much does it cost to run Facebook ads in India?
Should I boost a post or use Ads Manager?
How long does Facebook take to approve an ad?
Do I need a website to run Facebook ads?
Are Facebook ads and Instagram ads the same?

Ajay is the founder of ScaleWin. He works hands-on with Meta Ads, Google Ads and SEO for Indian D2C and service brands, and built ScaleWin so that the daily work of a performance marketer - reading numbers, pausing losers, scaling winners - happens automatically.
Drafted with AI assistance. How these articles are written
Want your Facebook ads run for you?
ScaleWin sets up and runs your Meta campaigns daily - budgets, creatives and pausing losers - with a WhatsApp report every morning.
Start your 3-day free trial